When we think of climbing injuries, most of us jump right to finger, elbow, and shoulder injuries. While injuries to these areas are definitely common, they are all upper body injuries. Last time I checked, we also use our lower body quite a bit when we climb.
Lower extremity injuries may be less pervasive, but they can be just as debilitating. Just as with finger, elbow, and shoulder injuries, the key to getting back to climbing as quickly as possible is to get an accurate diagnosis and then treat accordingly with the correct rehab protocol.
To help arm you with more information, today we have an article written for TrainingBeta by chiropractor and sport injury rehabilitation specialist Natasha Barnes in which she outlines her protocol for rehabbing hamstring injuries.
Natasha Barnes – Hamstring Injuries in Climbers
Hamstring injuries are very common among climbers, right up there with knee and ankle injuries. Because of the hamstring intensive nature of some of the techniques we use in climbing–namely, heel hooking–hamstring injuries are something I see with increasing frequency in my clinic. In this article I will discuss some of the ways we injure our hamstrings and my general approach to rehabbing this type of injury.
Hamstring Anatomy
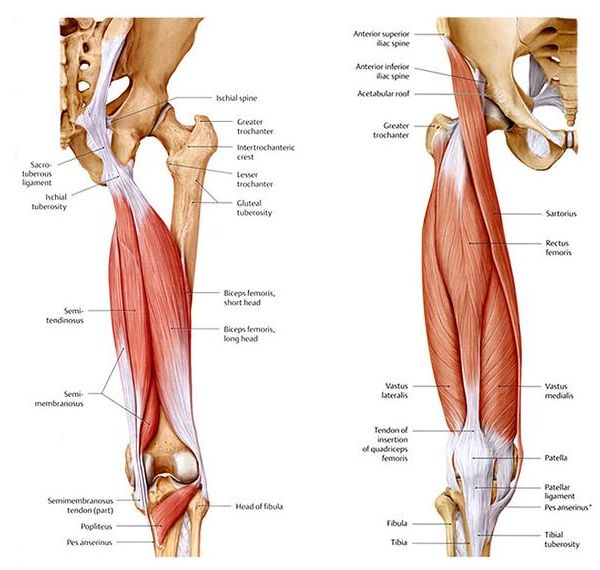
The general term “hamstrings” technically refers to the posterior thigh muscles, namely the semitendinosus, semimembranosus and biceps femoris (which includes both a long and a short head). These muscles begin at the pelvis and end at the lower leg, crossing both the hip joint and the knee.
Mechanism of Injury
A strain is a stretch injury or tear to a muscle or a tendon (side note: a sprain is an injury to a ligament). A hamstring strain happens when the hamstring muscle is pushed past its physiological limits and is stretched or torn.
Because the hamstring crosses both the hip joint and knee joint, the mechanism behind this injury is usually a combination of rapid pelvic flexion and knee extension, such as jumping, kicking a ball, falling with your leg extended or…heel hooking!
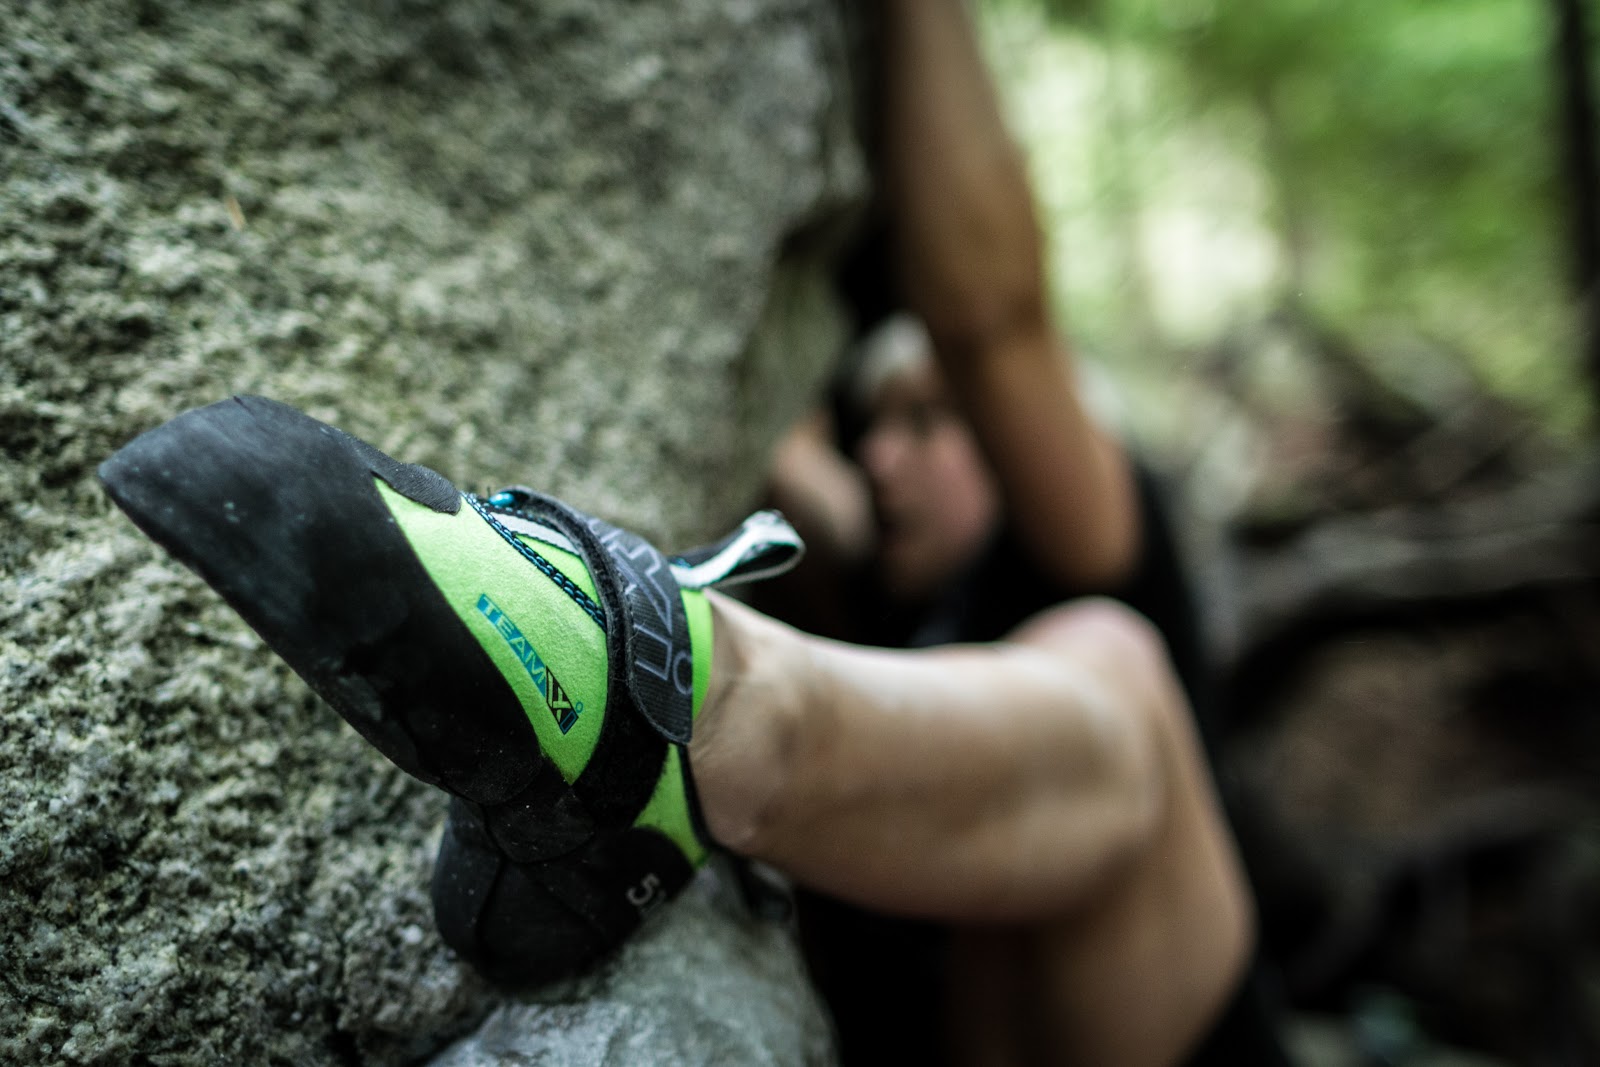
Heel hooking is a very effective and efficient climbing technique, but it is also extremely hamstring intensive. Because it’s so hamstring intensive, it’s usually the mechanism of injury for hamstring strains in climbing.
In my experience the biceps femoris is the most commonly injured hamstring muscle in climbers. This is probably due to the nature of heel hooking. Depending on the exact mechanism of injury, some climbers tear the proximal portion (closer to the hip) and some tear the distal portion (closer to the knee).
Some common causes of hamstring tears:
-
Hamstring weakness
-
Improper heel hook technique
-
Flexibility issues in the hips or the hamstring itself
-
Extremely high heel hooks
-
Falling while foot gets stuck in a bomber heel hook or heel-toe-cam
-
Heel hooking in extreme knee flexion (sometimes also involves meniscal tears)
Symptoms
Most climbers report a traumatic event followed by pain and cramping behind the thigh. The majority of hamstring strains will be associated with mild to moderate pain behind the thigh or knee. It is common to experience mild swelling and slight discoloration of the skin at the site of injury. Depending on the amount of damage inflicted on the muscle, spasm and bruising may accompany a hamstring strain. In more serious cases a climber with a complete rupture, or grade III strain, may experience severe pain, significant blood pooling with a large palpable ball of muscle protruding behind the leg. These climbers may not be able to walk without intense pain and should be evaluated by a professional.
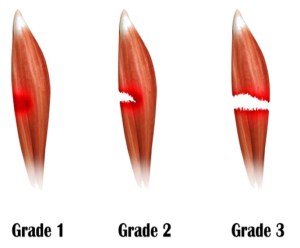
Grade I muscle strain: Mild muscle strain. The muscle or tendon is overstretched. Small tears to muscle fibers may or may not occur. You may have mild pain with or without swelling.
Grade II muscle strain: Moderate muscle strain. Grade II strain occurs when the muscle or its tendon is overstretched with some of the fibers torn but not completely. Symptoms may include marked pain with swelling. The area of injury is tender. Bruising may occur if small blood vessels at the site of injury are damaged as well. Movement may be difficult because of pain.
Grade III muscle strain: Severe muscle strain. Grade III is the most serious among the three grades of muscle strains. Most of the muscle fibers are torn. In some cases, the muscle is completely torn or ruptured. Pain, swelling, tenderness, and bruising are usually present. Movement is usually difficult.

Differential Diagnoses
There are a lot of structures in and around the knee that share similar symptoms as a hamstring tear when injured:
- Meniscus tear
- PCL sprain/tear
- MCL sprain/tear
- LCL sprain/tear
- Popliteus muscle injury
- Fibularis muscle injury
- Proximal tibiofibular head injury or dislocation
- ITB subluxation to name a few things…
This is why it is important to get a professional diagnosis so you know what you are dealing with. The treatment is different for some of these injuries so you really need to get a proper diagnosis to understand what is going on and how to proceed. I can’t stress this enough in all my articles.
Treatment
***This information is for educational purposes only and not meant to be medical advice. If you believe you have a hamstring injury seek professional help! At least get a solid diagnosis first before attempting self treatment.***
Most hamstring tears are simple by nature and do not require serious medical intervention or surgery. Even severe tears with a lot of swelling and bruising can be resolved with conservative care as long as avulsion fractures and retraction of the hamstring muscle can be ruled out via imaging.
I break down treatment into phases depending on how recently the injury occurred, how severe, and how the initial exam turns out. This is why you need a professional opinion before proceeding. Here is a general overview of my approach.
Phase 1
This is where I start for acute or severe hamstring tears. This can be anywhere from 24 hours up to 3 weeks post injury depending on the climber and the injury presentation.
First of all…DON’T ICE IT!!! Why? Read my last TrainingBeta article HERE on why.
I do not perform soft tissue work or stretching in this stage or recommend the climber do any on themselves as it can cause too much inflammation and interfere with healing at this point.
I subscribe to the Starr Rehab Protocol. It’s a high volume protocol with the goal of flushing blood to the injury site and throughout the whole body. It will NOT feel comfortable and it may hurt. You need to be able to distinguish the difference between what is ok and considered “rehab pain” and what is not ok and might be considered “re-injury” or aggravation. If you can’t tell the difference you need to work with a rehab professional. This method works to minimize scar tissue formation and helps the tissue heal normally. I do this using squats, deadlifts or Romanian deadlifts starting anywhere from immediately to a few days after initial injury depending on severity and presentation. These can be done daily.
I also prescribe heat or contrast baths to flush blood to the injured area. The more blood you can get to the injury the faster it will heal.
In rare cases, if pain is severe and complications have been ruled out (such as avulsion fracture and retraction of the muscle), I will recommend a high-dose anti-inflammatory regimen. 800mg 3x/day with food for up to a week. The purpose of this is to bring the pain down enough so that we can begin the rehab process.
The goal is to proceed to Phase 2 ASAP!
Phase 2
Phase 2 is the strengthening phase. This can begin anywhere from 48 hours to several months post injury, again, depending on the climber and the presentation of the injury. Most climbers have weak hamstrings and the goal here is to strengthen the hamstrings, hips and core so that climbers can heel hook properly without getting injured.
Weight Gain Sidenote
A quick side note on lower body strengthening and weight gain (because I know what you are thinking):
Gaining muscle is hard to do.
Muscle is metabolically expensive and if you are not eating a surplus of calories it is impossible to gain mass even while you are strength training.
In my experience most climbers do not eat ENOUGH during strengthening phases and end up LOSING weight (not necessarily a good thing).
The type of strengthening I prescribe is high intensity/low volume (heavy weight, 1-5 reps, 1-3 sets) and results in a mostly neurological strength adaptation. As a result, your muscles get better at recruiting more muscle fibers at one time during a muscular contraction. That’s where the strength gains come from.
As a rule of thumb, if you are not eating a surplus of calories you will not gain any weight.
Phase 2 Exercises
Here are some of the exercises I recommend for strengthening and rehabbing hamstring injuries. I do these 3x per week with at least 1 day off in between.
The Low-Bar Back Squat

The LBBS is a powerlifting style squat that emphasizes the low back muscles, abdominals, hips and hamstrings. It’s a functional way to get the hamstrings stronger and also all the muscles that keep you on a steep wall. This is different than the type of squat you see most gym goers performing. Unless they have been coached otherwise, most people you see in the gym are using a “high-bar” style squat, which is more of a quad dominant style of squat and does not stress the hamstrings as much as a LBBS. The difference is in the placement of the bar on the back. Very safe as long as good form is used. Proper coaching is necessary.
Conventional Deadlifts
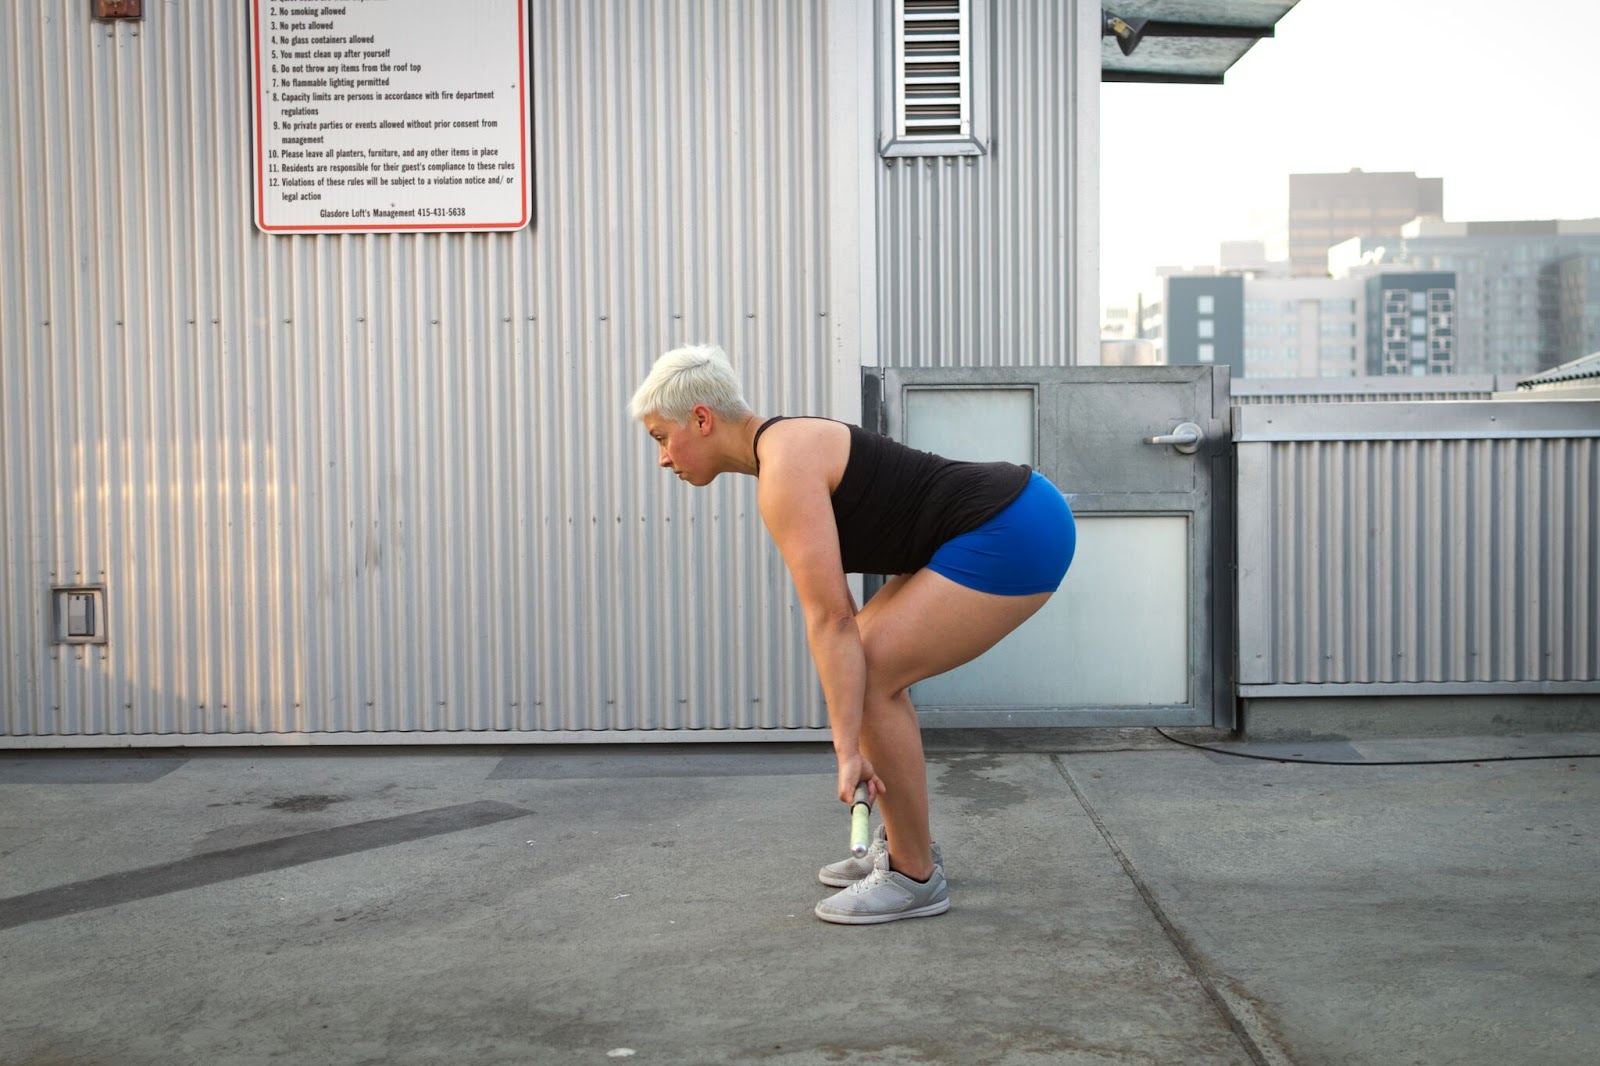
The conventional deadlift is a narrower stance deadlift with the hands placed outside of the legs. It emphasizes the whole posterior kinetic chain, lats, back, abdominals, glutes, and hamstrings. Ideal and functional for climbers since these are the muscles that keep you on a steep wall. Also, very safe as long as good form is used. Proper coaching is necessary.
Stiff Leg Deadlift

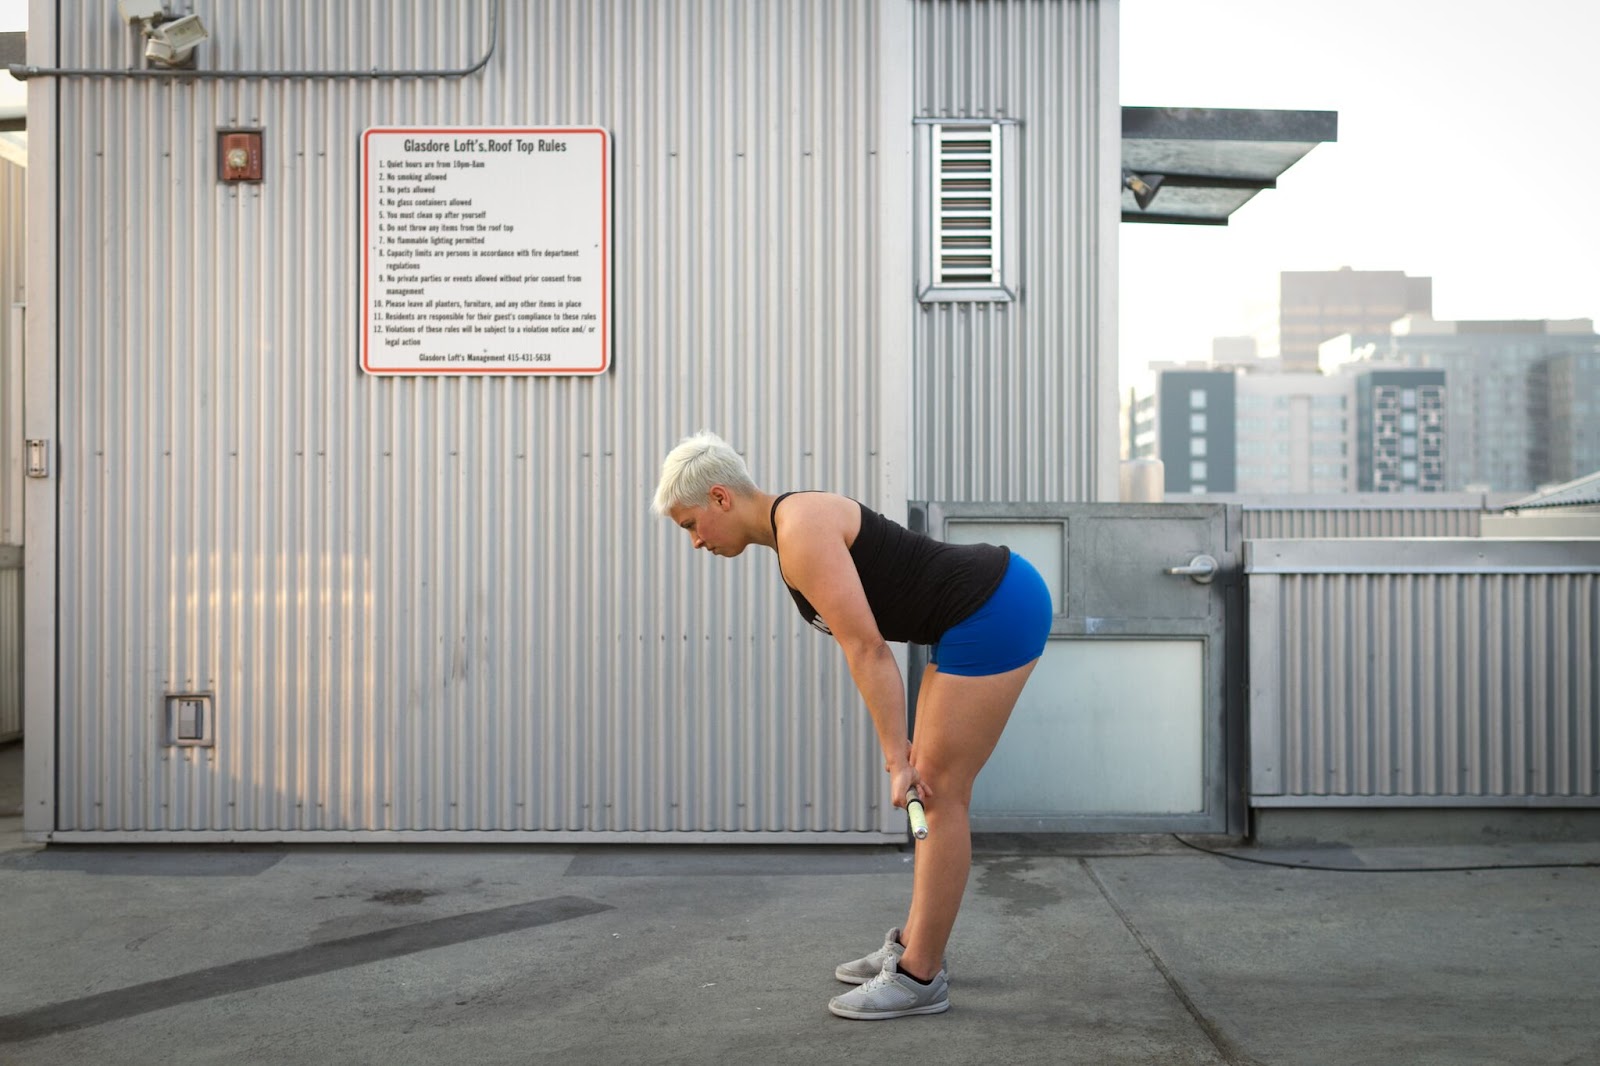
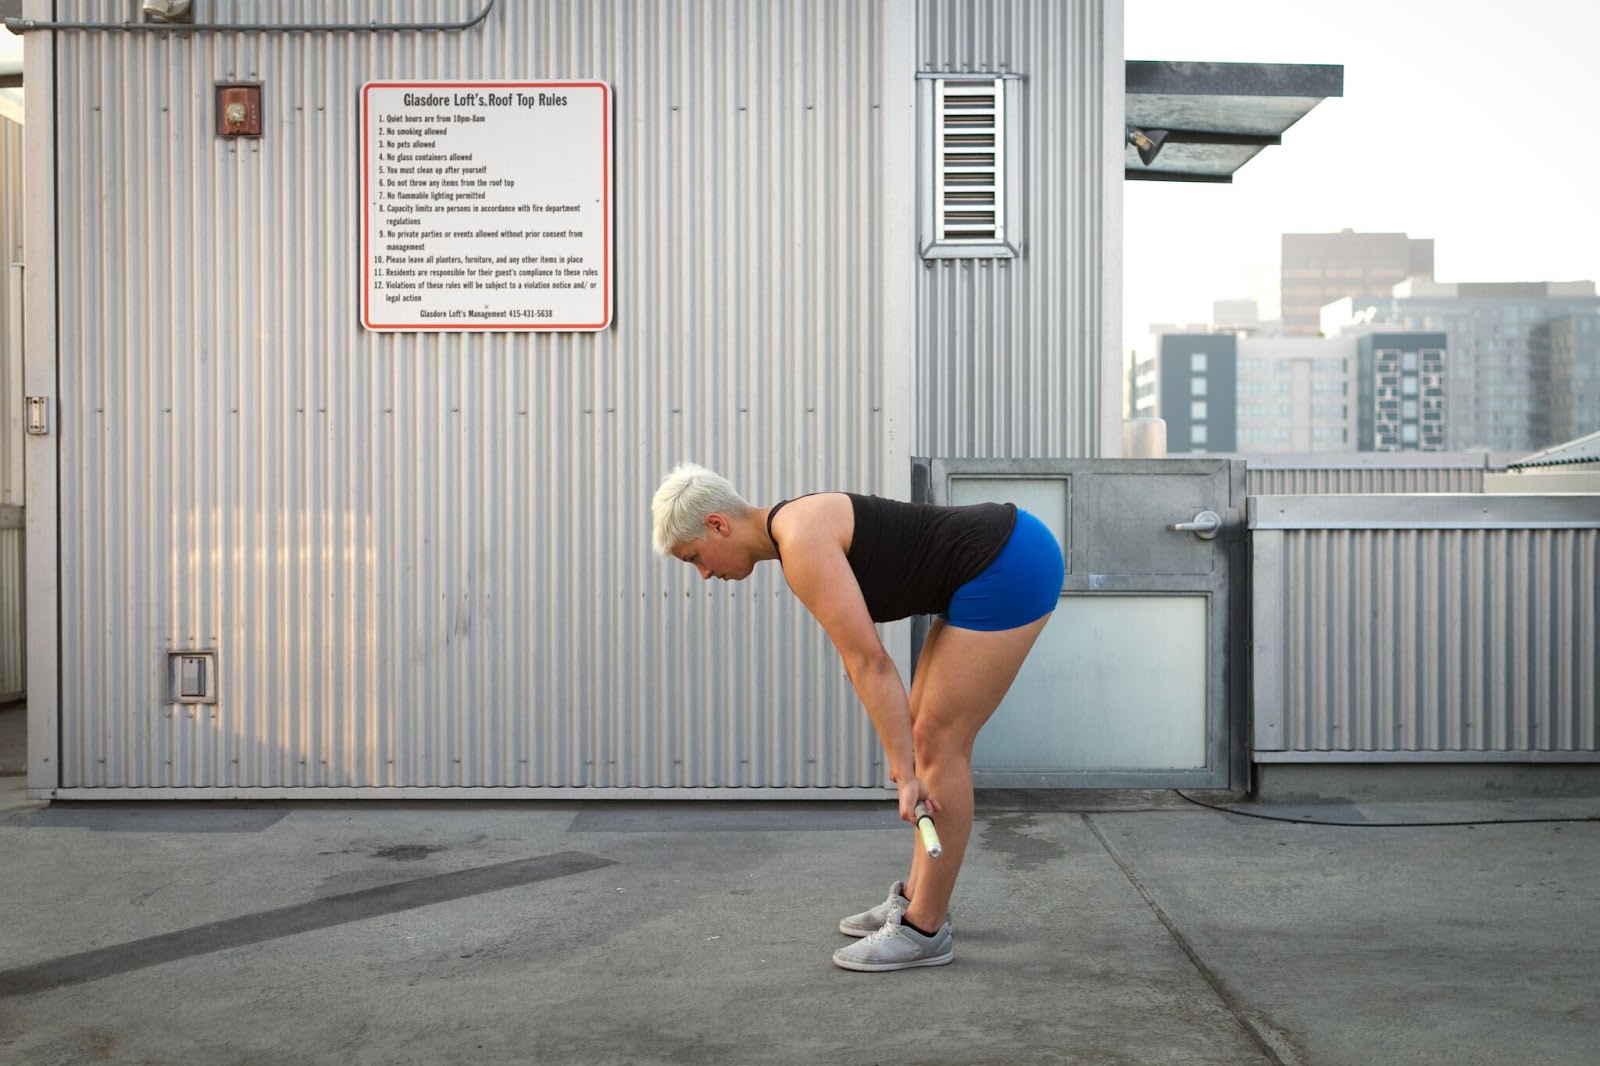
This is an alternative I use for climbers who need a more targeted hamstring exercise. 95% of the time a conventional deadlift will get the job done but I have had a few climbers that really needed some targeted hamstring work to really stress the injured area. These are usually climbers who don’t get symptom relief with only the squats and conventional deadlift. These are performed similarly to a conventional deadlift except starting from the top and without any knee bend. Your hamstrings will get very sore the first couple times these are done. Don’t say I didn’t warn you if you try them. As with all these lifts, proper coaching is needed.
The strength work will start to get heavy as we progress over the course of a few weeks and it has to if we actually want to get stronger. So don’t be afraid of heavy weights. With good form you’ll be fine. Nobody ever got better at climbing without trying something more difficult than the last time, right?
I highly recommend seeking out professional advice on how to perform these exercises from a qualified coach, PT or rehab specialist in your area. I also recommend checking out the book Starting Strength by Mark Rippetoe for further reading on the biomechanics of performing these movements.
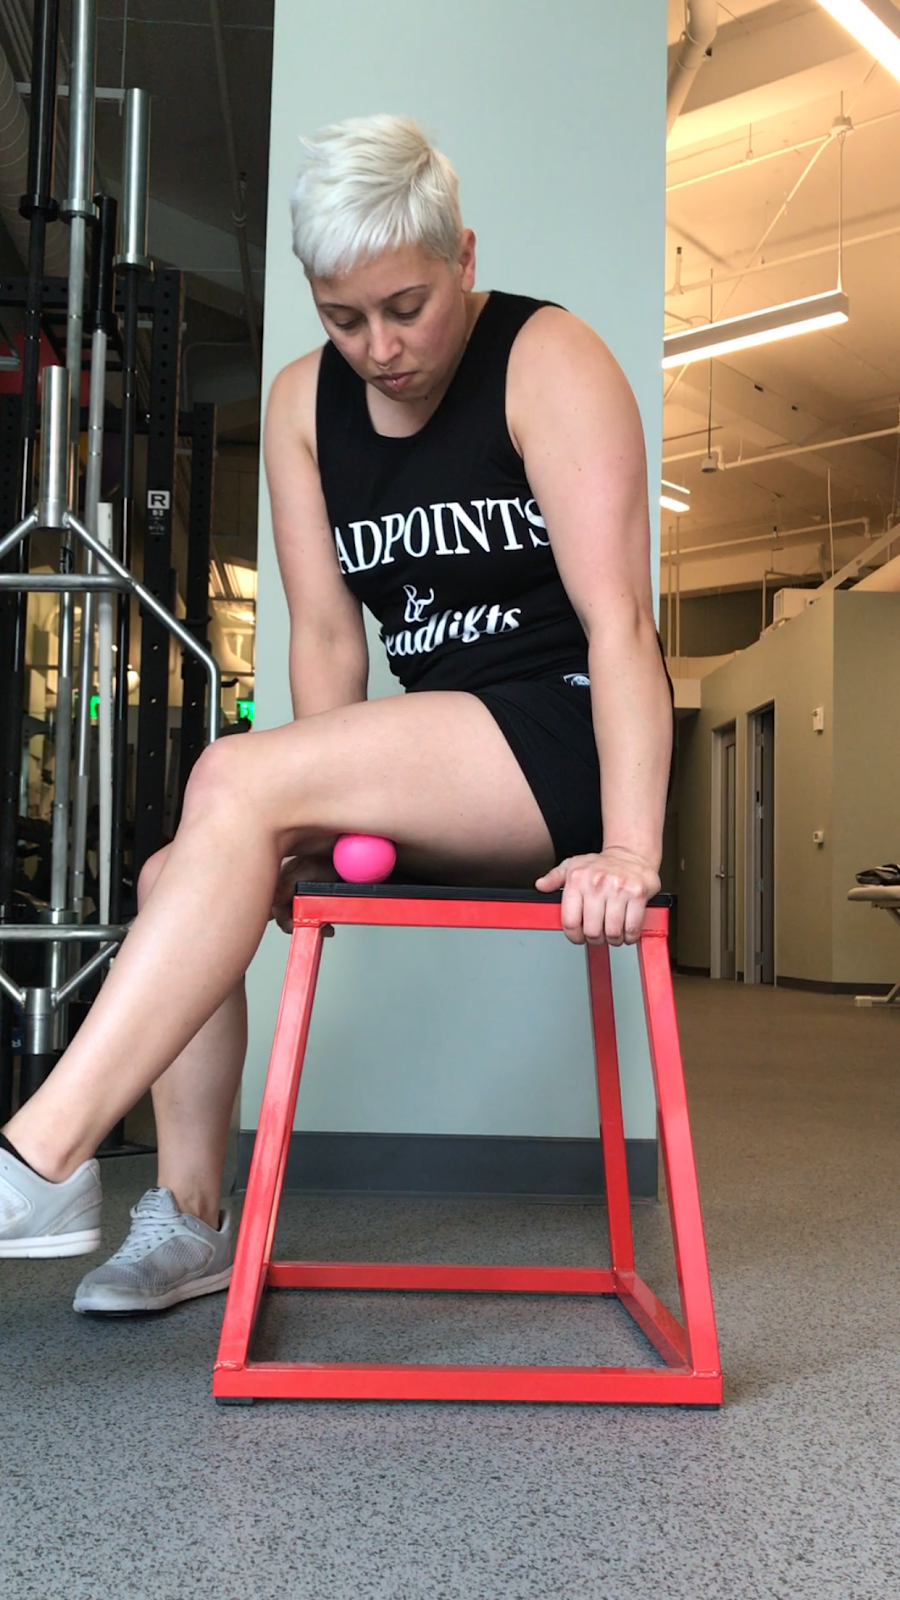
Tissue Work
Soft tissue work can be started in Phase 2 as well. I recommend using a lacrosse ball on a hard surface to massage into the hamstring for a few minutes everyday. The foam roller just doesn’t get into the deeper parts of the muscle like we need it to. This can also be done with a baseball, small kettlebell or other similarly sized round object.
I do not prescribe stretching to any of my patients at any point because none of the research shows that stretching is effective in and of itself. Eccentrics and isometrics are better and that’s what we are doing with squats, deadlifts and stiff leg deadlifts. Climbers can stretch if they want but I don’t find it as effective as some of the other things described in this article.
Climbing can be resumed in this phase with no heel hooking until cleared to do so. Move to phase 3 after 6-12 weeks.
Phase 3
In this phase the climber has been cleared to heel hook again, symptoms are gone and the climber has done at least 6 weeks of strengthening. Most climbers are good to start heel hooking at full strength again in this phase and no other treatment or steps are necessary. A small percentage of climbers will start to experience pain or discomfort when they start heel hooking intensively again. In these cases, I will add some intense hamstring isolation work to prepare the climber for heel hooking at full capacity again.
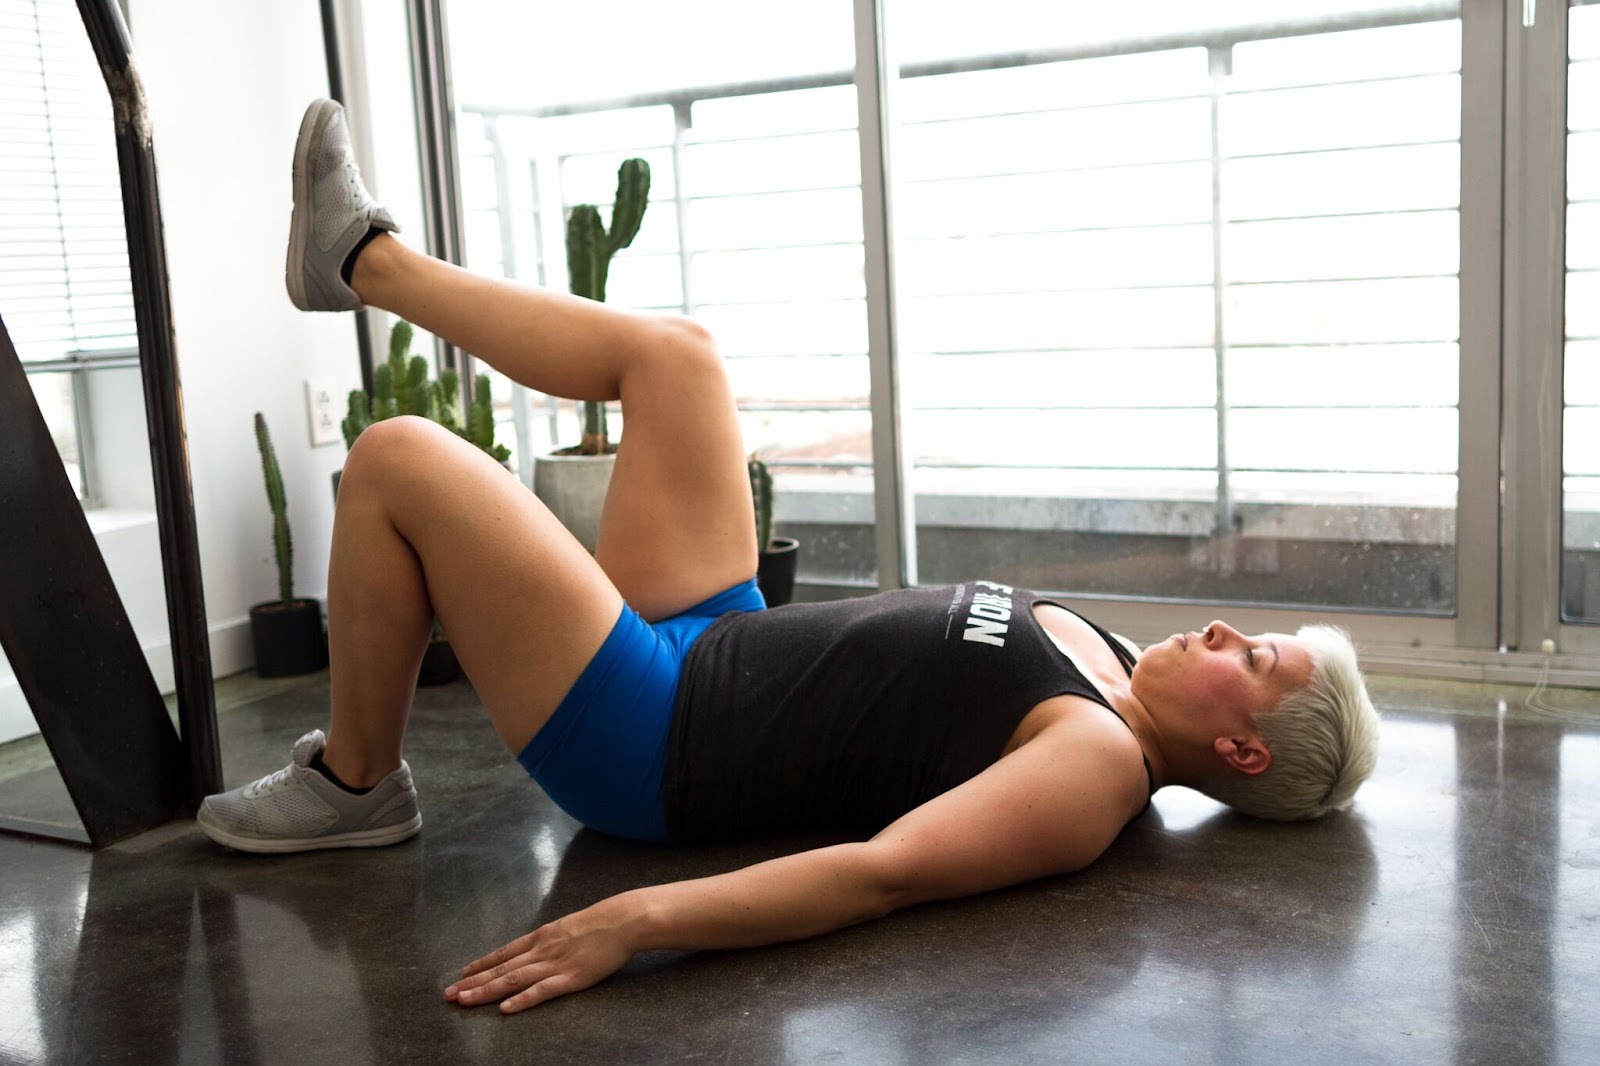
Glute Bridges
The single leg glute bridge works the hamstring in a more isolated way while exposing the injured muscle to similar forces it would experience during a heel hook. The farther out you place the heel the more hamstring involvement. The feet can be elevated for added challenge. Weight can also be used on the hips.

Technique work for proper heel hooking at the gym with a coach is warranted in the case of a novice-intermediate climber or climbers with poor heel hooking technique. If you fall into these categories, I would recommend that you sign up for technique classes at your local climbing gym or seek out professional coaching from a high quality coach who can work with you in person.
Here are some helpful articles on heel hook technique:
- How to Heel Hook from Climbing Magazine
- Heel Hook (link no longer exists) from Alli Rainey
Putting It All Together
As I mentioned above, this is just a general outline of how I would approach a hamstring injury. This isn’t everything. The details, technique and progression are highly dependent on the climber, the severity of injury, the presentation of the injury on exam as well as other factors. Hamstring injuries are relatively easy to treat and generally heal very quickly if rehabbed properly. The key is talking to someone who works with climbers, understands how we use our hamstrings, and knows how to rehab them properly.
The most important thing is to get a proper diagnosis as the symptoms can mimic other pathologies and it is possible other structures could be damaged with the same mechanism of injury. You want to know what you are dealing with before trying to self-diagnose and treat.
Cover Photo: courtesy of Josh Garza | @joshgarza_
About The Author

Natasha Barnes is a former competitive climber, a competitive power lifter, and a doctor of chiropractic with a specialty in rehabilitation of sports injuries. She lives in San Francisco, California and has a private practice at Motus Clinic.
She graduated from a 4-year graduate program at Palmer West Chiropractic School in San Jose, CA in 2012 with a specialty in sports medicine and physiotherapy. She’s a ClinicalAthlete provider for San Francisco, certified in Functional Range Release Technique (upper limb) and Myofascial Decompression (cup therapy).
Leave A Comment