
This article was written by Ross Bodine (Neely’s Physical Therapist). Ross Bodine, PT, DPT, FAAOMPT is a fellowship trained physical therapist that works at Alta Physical Therapy and Pilates in Boulder, Colorado. He specializes in identifying and correcting aberrant movement patterns in climbers before and after injury.
Mechanics Focused Climbing and Training
Working as a physical therapist, there are generally two kinds of climbers with overuse injuries I see when they come into the clinic. There are the ones that eventually come in to see me after climbing through pain for months on end (or they see me after an acute incident and then report the injuries that have plagued them for years). More commonly, there are the climbers that get an injury, take a significant amount of time off (weeks to months), try climbing again only to notice the pain is still there, and then try taking more time off to no avail before they seek help. In both of these cases, these two types of personalities would benefit from continuing to climb with a renewed focus.
The main point of this article is to really emphasize the importance of mechanics when training. Mechanics being how your joints are positioned, and how your muscles are being used to stabilize the joints as you are hanging, pulling, or generally positioning yourself on the wall. I’ll start by talking about the shoulder since its use determines how the rest of the upper extremity is used, and how well your body is positioned.
Most of how well the shoulder is used boils down to how well the rotator cuff is being used. The rotator cuff’s primary function, despite its name sake, is to apply compression to the joint and hold it in place as the larger, more powerful muscles (pecs, lats, and deltoid) move the arm. The scapula’s position will also heavily influence how the rotator cuff is used. Ensuring the rotator cuff is engaged and the scapula is well positioned will help prevent injury. Or if a little niggle already exists anywhere in the upper extremity (including finger pulleys), proper shoulder mechanics will allow you to continue climbing to a greater extent without pain and without worsening your injury.
Utilizing proper mechanics while training will help maximize the stress on the active joint stabilizers (to strengthen the rotator cuff), minimize the stress on passive stabilizers (the shoulder joints, labrum, biceps tendon), and reenforce proper movement patterns to climb more mechanically efficient. I personally appreciate this mode of training, because my brain works much better and is more interested in a mechanical problem-solving standpoint (as in “how can I position my body better so I don’t have to work so hard?”) rather than a physiological-adaptation one (“I’m going to train for at least 6 weeks until my body starts building muscle, and then probably train much longer to get huge muscles”). I think climbers in general appreciate the problem-solving aspect of whole body positioning when climbing (or there would just be ladder climbing gyms) – this focus is just geared down to positioning individual joints that in turn help to position the body.
Proper Hanging Position
Starting off by finding the correct hanging position is super important, as it engages the scapular stabilizers and rotator cuff. Training the rotator cuff and scapular stabilizers in a hanging position will teach you how to use them during a more functional activity comparative to climbing. Have you ever done those shoulder external/internal rotation exercises to strengthen the rotator cuff? Does that teach you to engage your rotator cuff when climbing?
No.
Okay, maybe if you were awkwardly clipping a bolt you could rotate your arm that way. But climbing is a closed kinetic chain activity, meaning you move your body around your contact to the wall (your hands). The traditional rotator cuff exercises are performed in an open kinetic chain, meaning you move your hand on a stable body, and would be more applicable to throwing, lifting, or reaching. Just because you train your body in one kinetic chain doesn’t mean your brain has the ability to transfer it to the other (it usually doesn’t). So, starting off by activating and then training the rotator cuff and scapular stabilizers in hanging is more appropriate for climbers.
The most common advice I have read about hanging position is to pull your shoulder blades down and back. The intent of that advice is to engage the lower trap, but pulling your shoulders down and back may also recruit the rhomboids (which downwardly rotate the scapula, leaving less room for the humerus) and lats (which can pull the head of the humerus forward in the joint with insufficient cuff activation).
A downwardly rotated scapula and a forward humeral head put the rotator cuff at a disadvantage, as it has to work harder in an inefficient position. The lats and rhomboids are more commonly the dominant muscles in climbers, as their action pulls you up the wall, and I usually don’t see them as being the weak link. If you feel your pelvis get pulled backwards and underneath you when hanging, your lats are working harder than the shoulder stabilizers and the core has disengaged.
There has also been debate on whether to avoid hanging with bent elbows, but from what I have found, the climber’s rotator cuff and core tend to disengage when elbows straighten, even when the shoulder blades are pulled down and back. Furthermore, as the proximal stability disengages and the elbows straighten, more rotational stress is put on the wrist and fingers which can lead to injury down the chain. Just focusing on bending your elbows when hanging may just engage your bicep/brachialis without considering shoulder stability. This would allow the humeral head to drift up and forward. It is better to think about keeping the elbows directly underneath the hands’ line of pull, and allow the elbow to passively bend as the shoulder does the work.
What I tell people is to pull the bottom tip of your scapula up towards your elbow, while keeping your elbows in, in order to lift your chest up. The elbow bend will then come from your shoulders getting pulled back as your scapula tilts back.

Pulling the bottom tip of your scapula up toward your elbow does 3 things:
1) Recruits Serratus Anterior – Focusing on lifting the bottom corner of the scapula up helps serratus anterior to externally rotate, upwardly rotate, and posteriorly tilt the scapula. All three of those motions will position the scapula better on the humerus. The lower trap will also engage to assist the upward rotation of the scapula. Furthermore, your chest will lift up, push you into a more of a front lever position, and feed into better core activation. This core activation comes from the alignment of muscle fibers that continue on from one muscle to the next, as the serratus anterior tie into the external oblique which continue on and attach into the front of the pelvis. This creates a line of tension from the scapula to the front of the pelvis, to counteract the force of the lats that connect into the back of the pelvis. Also, because of the nature of the front lever movement, your feet will also get pushed into the wall increasing body tension and improving foot work.
2) Engages Teres Major – Teres major is mostly just known as the “mini lat” as it connects on to the humerus, right next to the lats. However the teres major drops down just to the tip of the scapula, rather than connecting into the spine and pelvis that the lats do. And that is all we were actually taught about it in PT school (the research doesn’t expand much more on it either). However, teres major becomes much more important when hanging since it is a closed chain activity and your scapulae will move around your humeri. Teres Major in this case will pull the bottom tip of your scapula up to your arm, open up the shoulder joint, and take pressure off the labrum and rotator cuff. I will also argue that teres major’s muscle fibers will continue on to serratus anterior, feeding into it’s core stability.
3) Decreases Stress on the Rotator Cuff – When the scapula is rotated up and tilted back with the help of serratus anterior, the rotator cuff can more easily hold the humerus down and back on the socket. The head of the humerus can easily squirt forward in the socket when pecs/lats/posterior deltoid are the dominant muscles, and the cuff would have to work much harder in an inefficient position. Often, the rotator cuff can’t recover when the humerus is pulled forward and you’d have to rely on the ligaments for stability. You’ll notice the rotator cuff is engaged when the elbow pits rotate backwards and the back of the shoulder is more round and full, indicating the external rotators are centering the humerus on the scapula.
If you are having trouble identifying what serratus anterior, rotator cuff, and trapezius engagement feel like with hanging, you may benefit from another couple of my favorite warm ups: Y’s (focusing on the external rotation component, which is also the most difficult) and Pivot Prone (engaging the posterior cuff and serratus anterior in a lower lock-off position). Each of these are ideally held for 1-minute, followed by transitional movements between these two positions to resemble a pull up. I personally start with these two exercises before climbing almost every time. They can be seen in the below video.
Application to Climbing
Now to the fun part! Once the shoulders have found stability while hanging, try to maintain that level of engagement while climbing – however and how long you normally like to climb. But keep in mind if you normally climb until your fingers give out, stop when your shoulders start to give out (ideally before any of that fatigue really begins to happen). As you begin to pull the bottom tip of your scapula up toward your elbow, you should feel your chest lift up and feet press into the wall easier (especially on steeper terrain).
Be aware of where your elbow is in regards to the direction of pull:
1) They should ideally be dropped down perpendicular to the surface of the hold, and not pulled away from the wall.
2) The elbow should also be somewhat bent as you grab a hold with the elbow pits pointing backwards.
3) When the holds become further apart and you can’t keep the elbows underneath the hand, keep them between the shoulder and hand.
Climbing with this focus is especially important:
1) During the warm up period to engrain this movement pattern. Climbing with this intention on easier terrain will also lead to greater engagement and a more productive warm up. This engagement will then be easier to find when you get to climbing harder routes.
2) If you are unable to do a move. Grabbing a hold with a bent elbow, pulled in toward your body will get your center of mass closer to it. Your lower arm will also be working more, creating more tension through your core into your feet. You’ll find there will be less swing throughout your body when you do latch the hold, allowing you to maintain control easier.
3). During a power spot! I love these. Let a friend take a load off during a difficult move while your body learns to move this way. Once you grab the top hold during the move, stay there as the power spot lets go. Focus on the lower hand’s shoulder and elbow position, find the core engagement as your push into your feet, and slowly take weight off of the top hand – hold as long as you can. Repeat a couple of times, play around with the positioning, and find the subtleties that maximally engage your core. When you try the move again, things should click a little easier as your body learned that movement.
4), And most importantly when injured! There should be immense reduction in symptoms with the shoulder positioning and engagement. If you are climbing and feel a little niggle, try that move again with extra focus on your positioning.
As you work on your mechanics, you may say, “This sure doesn’t feel more efficient; I’m working a lot harder!” And its true – you are working a lot harder, but hopefully in different places as you are expanding your repertoire of movement patterns. Running with a better mechanical form (leaning forward and resembling more of a sprint posture) that can decrease knee pain is actually less energy efficient because it relies more on the gluteals (large energy demanding muscles) rather than conserving energy by bouncing off the tendons. The energy efficient form of running resembles the more upright posture of elite marathoners. Climbing is very likely to be the same, but training in mechanically efficient forms will carry over to the send burns, while significantly reducing overuse injuries. You can always drop down onto your ligaments when you need to, but perhaps with improved shoulder fitness, you may also find that you can rest with bent elbows in better positions.
Moving with ideal mechanics 100% of the time is impossible. And straying away from these movements during maximum effort attempts is okay – your body has the redundancies to move with your elbows out away from the wall, or disengage when resting. But when that movement pattern becomes the dominant and only movement, things can break down. Let’s face it – trying hard and swinging around wildly feels really good sometimes – just not all the time, and especially when that movement is not necessary.
Other Helpful Tools for Injury Rehab or Prevention
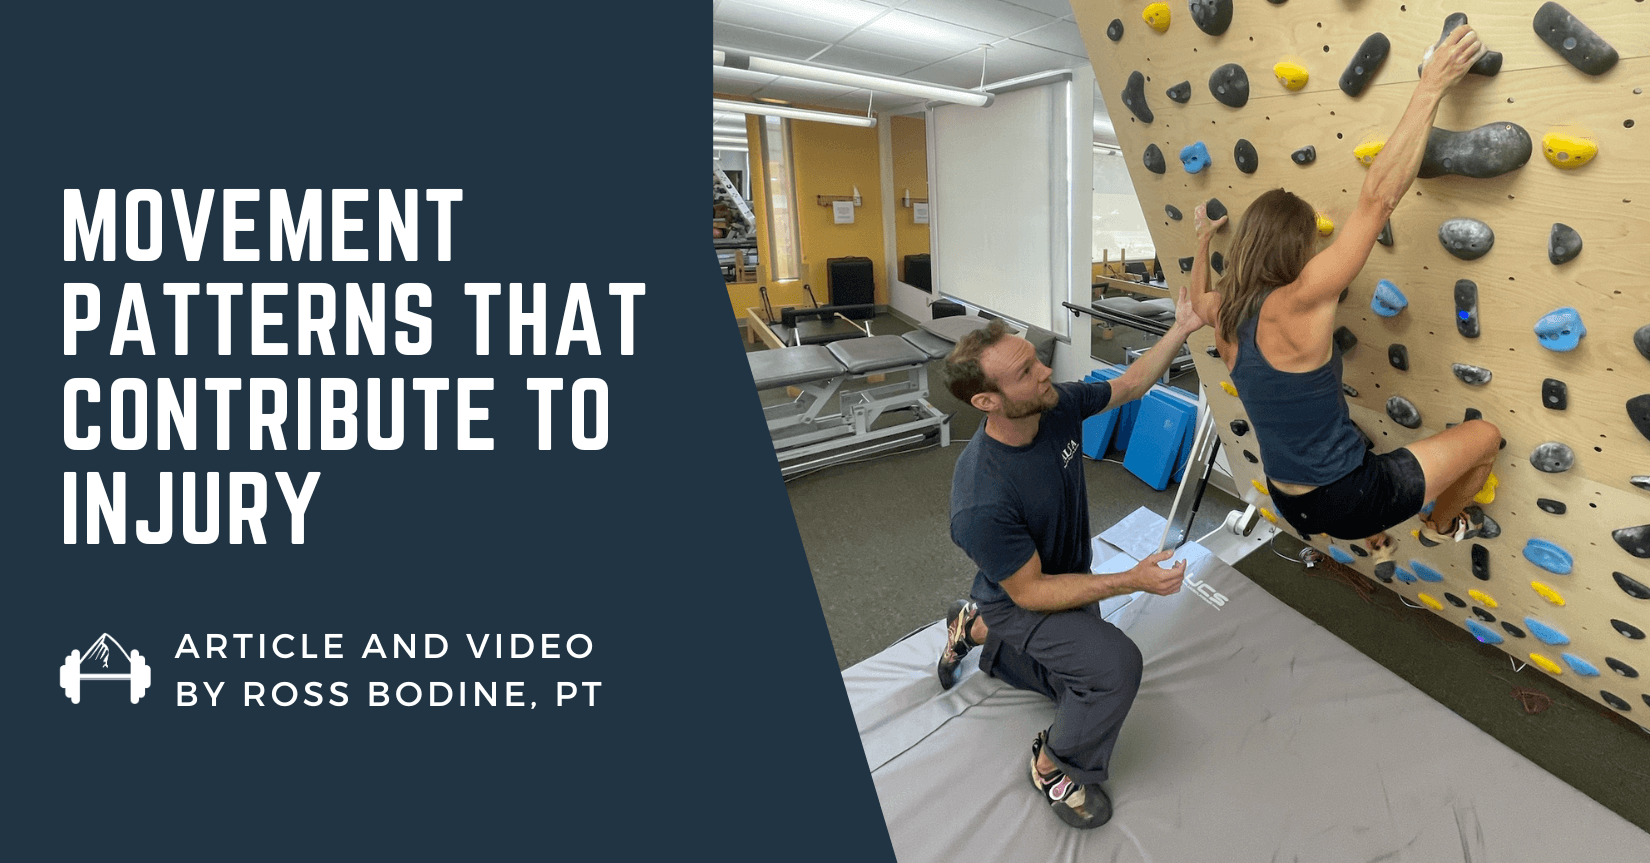
How do you know if everything is moving properly? Access to a symmetrical system board is kind of key. Being able to do the same movements to the right and then to the left helps to highlight any asymmetries and weaknesses side to side. These asymmetries largely go unnoticed under normal climbing conditions, as you may always want to turn your hip in on one side, but square up on the other. A symmetrical board will also highlight difficulties in maintaining body tension from side to side. For example, I was terrible at keeping my right foot on when my left hand was on the wall – I’m still not great, but it is getting better. If you can feel the asymmetries, that is great. Most people can’t, however, as your natural movement pattern feels normal, and the new movement patterns feel awkward. Video analysis would help a lot.
At my clinic, we have the Grasshopper Ninja. Grasshopper’s set in particular has not only been immensely valuable in identifying asymmetries in shoulder use and body position, but also grip position due to the shape of their holds. It has worked great at getting climbers to first load their upper extremities after injury or surgery with actual climbing movements (as we all know climbing can be much more variable than just hanging or doing a pull-up since there are more asymmetrical loads in various body positions).

Ross observing Neely Quinn on the Grasshopper board
Furthermore, it has been a fantastic tool in releasing climbers to climb without restrictions, as I can confidently say, “We loaded your wrist at a steeper angle than you normally climb, in all various angles of pull (side-pull, gaston, undercling), and it held up well.” Previously, telling climbers they “should” be okay was a little nerve wracking for me – because I couldn’t test every nuance and had to encourage the climbers exploration of movement.
If a full system board is out of reach, a hangboard or campus board (with foot chips) will still help identify different positions side to side as you add new stresses. Otherwise, hanging and all of the pull-up variations are also a great place to start to recruit the better scapular stabilizers and rotator cuff.
A Little More on Hangboarding
Hangboarding is actually also a great tool to start focusing on your proximal shoulder stability. I know most people think of it solely as a finger exercise, but hanging takes the whole body! Most of the traumatic shoulder injuries I see in climbers come from fingers that are stronger than shoulders: feet cut, hand/s continue to hang on, but the shoulder/s let go, and they drop onto their ligaments. Utilization of the hangboard should be expanded to develop and maintain the whole body strength.
Focusing where your shoulders are while hanging can be applied to your current hanging program what ever that may be (7 on 3 off, 5, on 5 off, Max Hangs, etc). A few more things to think about:
1) Initiate the hang by lifting yourself off the ground. This activates the muscular unit, and engages your brain. Dropping down onto the hold by picking your feet up stresses the passive structures (tendons and ligaments) and more easily pulls the shoulder out of position.
2) Start off with bigger holds. Just like your hips have to work harder if you are standing way up on your tip toes (go ahead and try it), your shoulders have to work harder when you decrease the amount of finger on the board – much more so when you start removing hands.
3) If you can’t maintain the shoulder/scapular positioning, your rep is done. Lower your self down, rest, wait until the next rep. If you are unable to hold that that rep for the full count, rest for at least two minutes before continuing onto the next set.
4) Hangboarding can be a great warm up! It gets your brain engaged in a very functional manner – it is closed chain just like climbing. Then as you get to climbing, your brain and body will more easily find a better shoulder position.
5) If you don’t have a current protocol start with 5 s on, 5 s off, and do this until form failure. Rest 2 minutes, repeat 2-3 sets. Aim for at least 10 reps in a set. Can’t get there? Use a bigger hold or hold 3 sec, rest 7 sec. Too easy and able to do 15-20 reps – smaller hold or 7 sec on, 3 off.
Summary
As a physical therapist, there are many other things that are important for me to consider, but analyzing and correcting movement patterns is by far the most important thing for me to do. Improving the mechanical efficiency has also become my most effective mode of treatment, and it must be consciously thought about during the activity for it to stick. It is hard work and mentally taxing at times, but it does reap rewards when it becomes automatic.
If you do have pain, let the pain be a reminder to focus in on your mechanics. Working on the the mechanics is difficult to find meaning in before injury, but it is no less important as it helps prevent overuse injuries. Working on them by yourself is great, but you may also need to see someone with a trained eye to ensure proper positioning. Ideal mechanics also expand much further than just focusing on the shoulder. For now, just keep the shoulders engaged with the elbows in, chest up, scapula pulled up to elbow, and see what that can do for you.
 Follow Ross Bodine and Alta on instagram for extra tid-bits on climbing and rehab @altaptpilates, or he can be reached at ross@altatherapies.com for any follow-up questions.
More information about his clinic can be found at altatherapies.com, and in person visits can be set up by calling the front desk at 303-444-8707. He can also offer remote visits for those out of the Boulder area with access to a wall or training equipment.
Leave A Comment